The UCD 33 carburettor is very reliable and should not give problems at all for most part of your Bullet's life. However in the rare case you do think that your Carb is giving problems and needs to be cleaned, do not worry. It is a really simple process. So simple in fact that you can do the whole process within five minutes. So let's get started.
How to check if you need Bullet Standard 500 carburettor (UCD33) cleaning
1. In case you think that water has seeped into your fuel tank and thereby into your carburettor.
2. You have filled petrol from questionable fuel stations which have dirt in their petrol causing the engine to skip.
3. In case it has been too long and you just want to ensure that no dirt has accumulated in the carburettor.
2. You have filled petrol from questionable fuel stations which have dirt in their petrol causing the engine to skip.
3. In case it has been too long and you just want to ensure that no dirt has accumulated in the carburettor.
Tools required for Bullet Standard 500 carburettor (UCD33) cleaning
1. Simple Screwdriver
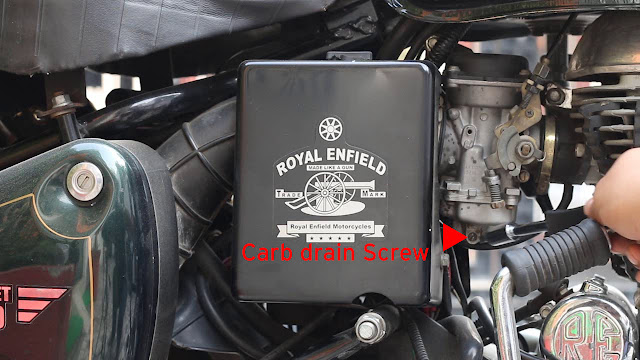
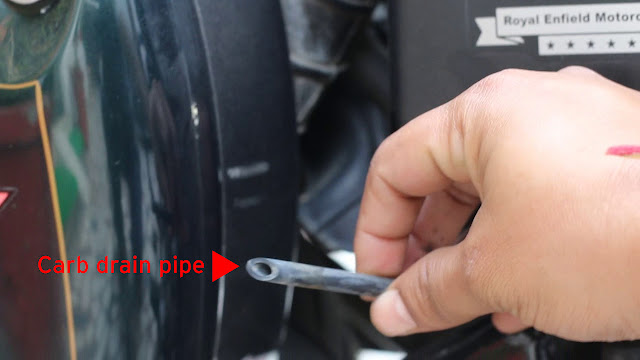
Important parts to know for Bullet Standard 500 carburettor (UCD33) cleaning
Procedure for Bullet Standard 500 carburettor (UCD33) cleaning
 |
| Turn drain screw anti clockwise |
2. As you'll start turning the screw you'll see the fuel coming out of the drain/ejection pipe.
3. You can start collecting this fuel in a bottle. You can choose to use this fuel for cleaning greasy parts of your bullet.
4. Take out the drain screw so that every drop in the carb is drained out.
5. Once this is done drain screw should be fitted tightly to the carb again by turning it clockwise.
Post Procedure for Bullet Standard 500 carburettor (UCD33) cleaning
Turn on the fuel valve to its on position.Go for a ride.
However common problems that you may encounter are given below:
1. Motorcycle is not starting
Turn on choke, start the motorcycle and then turn off choke
2. Motorcycle is still not starting
You may have had the fuel valve in reserve position earlier and put it in on position after cleaning. Put the fuel valve to reserve and start the motorcycle.
3. Motorcycle is still not starting
You may have had the fuel valve in reserve position earlier and the only fuel you had was in the carb which you drained out. Push your Bullet to the nearest petrol station and have it filled. Let the experience be a reminder to fill up the fuel tank as soon as it is in reserve.
4. Could not locate the drain pipe and now my floor is soaked with petrol
The procedure should be performed in a garage or a place where the floor is supposed to get dirty. Thank god that your floor is not soaked in grease or engine oil and move on with life.


Thanks a lot, Bhai. Please keep writing posts. One of my suggestions is instead of writing different blogs for every section of bullet, it'd be nice if you can maintain one blog and create different posts for each category. Keep up your good work. Thanks again!
ReplyDeleteThanks Bramm,
DeleteAll my maintenance posts are featured within the blog HTTPS://Enfieldmaintenance.Blogspot.in My other blogs are for Enfield modifications, accessories and mechanics respectively. I hope this gives better clarity to the readers. Do inform if anything else is required.
Thanks Bramm,
DeleteAll my maintenance posts are featured within the blog HTTPS://Enfieldmaintenance.Blogspot.in My other blogs are for Enfield modifications, accessories and mechanics respectively. I hope this gives better clarity to the readers. Do inform if anything else is required.
The write up is missing the whole opening up the carb unit and cleaning part. Its just the draining procedure in case you get some water in your carb accidentally.
ReplyDeleteHey reader,
DeleteOpening up the carb is actually not necessary in UCD 33 carbs. As you can directly clean it out by draining. In case there is any particular reason for which you think opening up a carb is required do tell me and I will write a tutorial on it as well.
Hey reader,
DeleteOpening up the carb is actually not necessary in UCD 33 carbs. As you can directly clean it out by draining. In case there is any particular reason for which you think opening up a carb is required do tell me and I will write a tutorial on it as well.
After opening the screw nothing is coming out of drain pipe
ReplyDelete